Validate the simulation flow
Validate the process by setting the number of simulation instances the process will trigger and defining the probability that activities are performed, or the conditions that control the simulation flow.
To validate the flow you need to set the parameters of events, sequence flows and gateways. You can associate parameters with a calendar to help you to predict how a process performs at different times.
The moment a simulation starts, you can monitor its progress on the Simulations page. Once the simulation is complete, you can view and download the results to see if the flow behaves as expected.
A successful validation will have the same number of tokens at the start and at the end of the simulation. If there’s a difference in the number of tokens, the simulation results will help you understand where the flow gets stuck or loops.
Configure event parameters
Define the maximum number of instances the process will trigger and the interval between triggers.
Trigger count
Define the maximum number of instances the process will trigger. If you don’t give a value, the process will trigger instances without end.
You can configure this parameter for start events.
-
Select the event.
-
In the Parameters panel that opens, click
next to Trigger count and select Add default value or associate with a calendar. -
To set the parameter value, click the current setting.
-
In the dialog box that opens, indicate the number of times to trigger this event.
Use whole numbers.
Inter trigger timer
Define the time interval between occurrences of the event. The event will trigger repeatedly at regular intervals until the trigger count is reached.
You can configure this parameter for start events, intermediate events and boundary events.
-
Select the event.
-
In the Parameters panel that opens, click
next to Inter trigger timer and select Add default value or associate the parameter with a calendar. -
To set the parameter value, click the current setting.
-
In the dialog box that opens, set the trigger type and value.
Format Description Short format Set the time interval between triggers as one value in seconds, minutes, hours, days, weeks, months or years. For example, trigger an instance every 5 days. Long format Set the time interval between triggers as multiple values. For example, trigger an instance every 3 days, 2 hours and 1 minute. Distribution Every distribution has it’s own specific parameters. Select the distribution that best serves your purpose.
Configure sequence flows
You can set either conditions or probability, but not both, on sequence flows, exclusive gateways, and boundary events.
Using probability and conditions in conjunction with property parameters enables more dynamic and realistic simulations, allowing you to model complex scenarios where both conditions and properties influence process behavior.
Probability
Define the probability that the process will diverge into different paths by setting the combined values of sequence flow probability.
Probability values are in percentage and all values combined must equal 100. If you don’t define them, they will be equally distributed.
To set the probability:
-
Select the sequence flow, gateway or boundary event.
-
In the Parameters panel that opens, in Probability, click
and select Add default value or associate the parameter with a calendar. The default setting equally distributes probability across the sequence flows.
-
To set the parameter value, click the current setting.
-
In the dialog box that opens, use the slider to set the percentage or type the exact value.
Once you’ve set a probability value you can use the corresponding toggle to lock the value so that it doesn’t change when other values are modified.

Conditions
Define the conditions that control the simulation flow by setting specific rules that determine when a process should proceed along a particular path. Conditions determine the criteria for triggering an event or token. For instance, a token will follow a specific path if a particular condition is met.
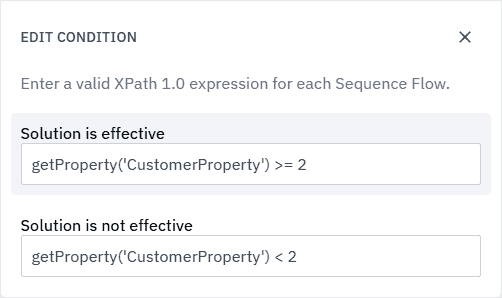
Conditions are defined using a boolean expression in XPath 1.0 format.
To create more realistic simulations, you can link property parameters to conditions by using the getProperty() function. For example, in the image below, the getProperty(‘CustomerProperty’)>=2 function is used to specify that the process will follow a certain path only when a specific property reaches or exceeds a defined threshold.
To set a condition:
-
Select the sequence flow, gateway or boundary event.
-
In the Parameters panel that opens, in Conditions, click
and select Add default value or associate the parameter with a calendar. -
To set the parameter value, click the current setting.
-
In the dialog box that opens, enter a valid expression for each sequence flow.
If a sequence flow was set as the default, it’s condition will automatically be set to ’true’.
Edit a parameter
-
Select the element.
-
In the Parameters panel, select the current setting.
-
In the dialog box that opens, make your edits.
-
Click
to close and save.
Remove a parameter
- In the Parameters panel, click
next to the parameter you want to remove.